
Your broadband problems will not bother you anymore, thanks to SpaceX’s Starlink, whose release has been a sigh of relief for many consumers who look forward to having a seamless surfing experience.
Whether at the office, at home or transitioning from Point A to B, Starlink offers a smooth internet experience and lets you utilize it to the maximum in urban, rural, or remote areas.
The satellite technology it works with has been a game-changer, adding more to the popularity and client base of Starlink.
You can select a plan per your preference and install the internet for effective functioning. Installing Starlink is no rocket science. All you need to do is to have the right tools for installation. This article covers everything about installing and setting up your Starlink internet service.
Read it till the end.
Contents
How to Install Starlink?
Installing Starlink in your residential or commercial premises is easy. In just a few steps, you can welcome a seamless internet beaming into your home. Even if you prefer low latency, the installation of Starlink will allow you and ensure effective functioning. Follow these steps to install Starlink and utilize it to the optimum.
1. Download the Starlink Application
First things first! Before you unbox the hardware, download and install the Starlink app on your phone. With the help of the app, you can manage your internet, as it is vital during each setup stage to configure various settings and help troubleshoot any problem encountered during the operation of the internet.
If you cannot surf the app by any chance, fret not. You can visit the link – http://dishy.starlink.com/ on your computer system connected to Starlink internet.
2. Check for obstructions
The simplicity of Starlink comes from the condition that the dish should always have a clear view of the sky. Thus, when you set up the internet, ensure you have cleared all the obstructions between the two. Starlink offers a simple method to check for potential installation locations where obstruction is either zero or minimum.
Obstructions are anything that blocks the sending and receiving of the signals between the satellite and the dish. They can be of any kind – trees, buildings, and more.
If you remove the obstructions before installing your dish, it will give you a seamless internet experience, and your Starlink will function properly.
To check for obstruction, all you need to do is stand over the mounting location and tap on the check for obstruction tab. The obstruction tool will use your phone’s camera to scan the sky. After finishing the sky, you will be offered the results showing whether that location fits.
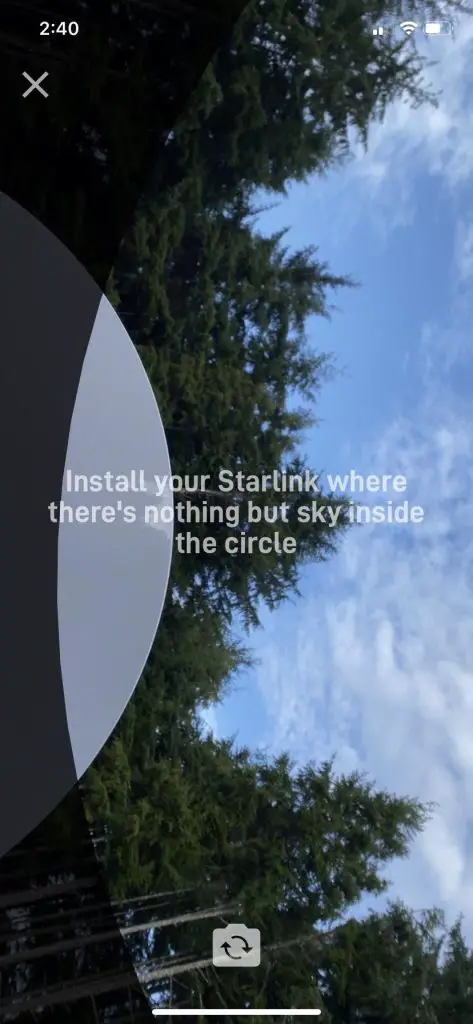
Checking for obstruction is a simple process that necessitates only the Starlink app. Stand over the mounting location and tap on the check for obstruction tab. The obstruction tool will use your phone’s camera to scan the sky for any obstructions. After finishing the scan, you’ll be offered the results showing whether that location fits.
3. Unbox the Starlink kit
Starlink is a detailed company; surprisingly enough, it has everything you will need to install the next-generation satellite internet perfectly. Inside the Starlink box, you expect to find
- A dish or antennae
- A mounting base
- A 75-inch transmission cable
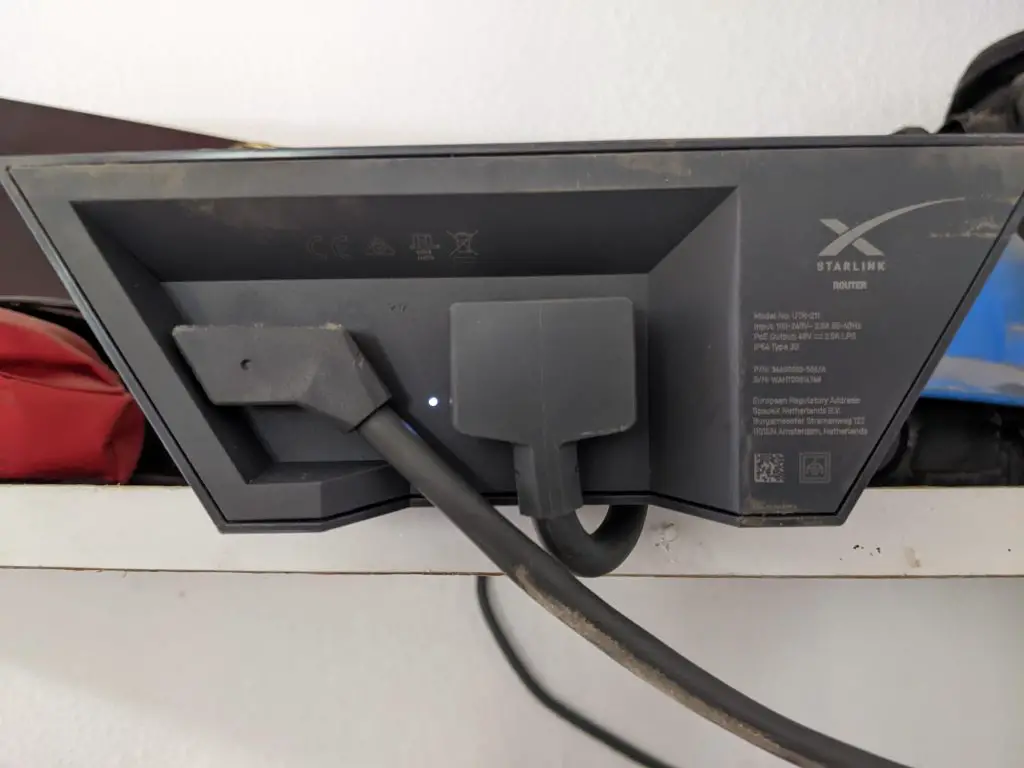
- A wireless router
- A wireless router power cord

The Starlink Wi-Fi router is crucial to your new speedy internet connection and is the base unit for providing your home internet. You should find a perfect spot for the router by following the same guidance for placing the standard Wi-Fi router.
Installing any Starlink is a handy procedure and necessitates other handy tools to accomplish the work. The tools vary depending on the position you want to set up your Starlink. Other tools that you should have to simplify the installation process include.
- A hammer
- A plier
- Set of screwdrivers
- Iron clips
4. Assemble and install the dish
The next step involves assembling the contents of the dish. You can begin by placing the dish in the desired location with your mount. The cable has two different sides.
One connector is straight, and the other is an elbow. Plug the former into the dish and ensure it is fully seated. Insert the pole into the mounting base such that two spring tabs lock into place.
You can use this mounting base for temporary, permanent, and even portable installations. Install the dish where you have checked for obstructions. If the provided mount doesn’t offer the best mounting option, you can use other structures to effectuate the transfer of signals.
Some of these other mounting options include:
The J-Mount is an extensively available and affordable mounting option with a diameter of 1.5 inches. It is considered a great option for roofs, fascia, and external walls. But it is not suitable for the areas with a lot of obstructions.
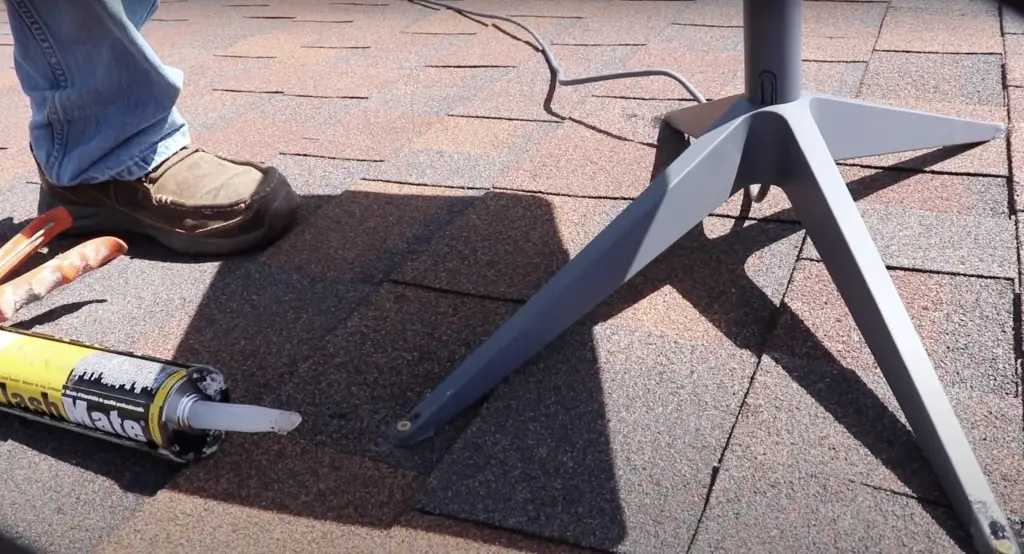
The flashing mount installs under the top layer of shingles and secures your roof a strong and leak-free solution. It requires an aftermarket for the pivot mounts to secure the dish. It works best with roof installations and high snow locations.
Non-penetrating roof mount is another sought-after mounting option that doesn’t penetrate the roof but is held down by weights such as sand.
The tower mount is another option where you can install a dedicated tower to get the vertical height necessary to clear the trees around the house. It is best for tall obstructions when mounting on the roof is not an option.
The pole mount is another mounting option. You can install it when there are no obstructions in your area. A pole for Starlink mounting requires a 1.5-inch diameter pole and a pipe adapter or U-bolts to secure the dish. It is the best option to opt for when you don’t want to mount your dish on the roof.
If you want to install your Starlink on a flat surface but want it to keep more elevated, a tripod mount is the best option to consider. It comes with a mast that allows for compatibility with the Starlink dish. It is the best for temporary and permanent solutions on flat surfaces.
A chimney mount is another mounting option suitable when the height is a primal factor to avoid unnecessary obstructions. You can use your existing chimney to secure a pole for mounting the Starlink dish.
All said mount options are considered for both residential and commercial setups, but what of those RV Starlink options? Below are some Starlink RV mounting options that you can consider.
- Pole mounts – many RVs have a pole and an existing mast that you can use to mount your dish. RV options require an adjustable adapter as it involves frequent motions that allow for better connectivity.
- The Starlink base mount – the Starlink that comes with your Starlink kit can also be used as it allows for temporary or permanent installation. This allows for use when not in motion and when in motion.
5. Run the cable
Once you have set the dish in position, direct the cable to the router. It means you are running the cable into your home.
You can opt for different methods to do the needful, such as drilling holes through the outer wall. The company offers tools for routing the cable through normal walls and others for bypassing masonry or concrete.
6. Plug Everything In
Once you have identified the most suitable mounting option and conducted the mounting procedures, it’s time to plug everything in. The end of the 75’ cable needs to be directed inside your house, back to the router. The elbow connector comes at the bottom. If you want to carry out a long-lasting installation, drill a hole to direct the cable through the outside of your home.
The final connection includes plugging the router into the power supply cable. Before doing so, ensure your dish is loose on the pivot to allow it some free tilting. After plugging in, the router and dish will power up and start searching for satellites. As the Starlink dish is subject to self-alignment, you don’t have to move, aim, or align it manually. Just ensure the dish mast is upright and doesn’t have any blocks.
7. Connect to Starlink
After you have switched on the router, the initialization process starts taking place. It can take a few minutes. Once done, open the Wi-Fi settings. You will see a new wireless network called STINKY.
Connect to this network. A new window will open with a successful connection. Now, you can configure a new name for this connection and set your desired password. Save all the settings, you will be fully connected to the Starlink network.
Troubleshooting Starlink
Once you have installed Starlink and connected it to the right network, you will start receiving the internet service. If otherwise your status appears offline or disconnected for a long period, know there is some problem with the setup. To resolve this problem, you can troubleshoot and look for it.
Here are some problems you might encounter after installation and how to fix them.
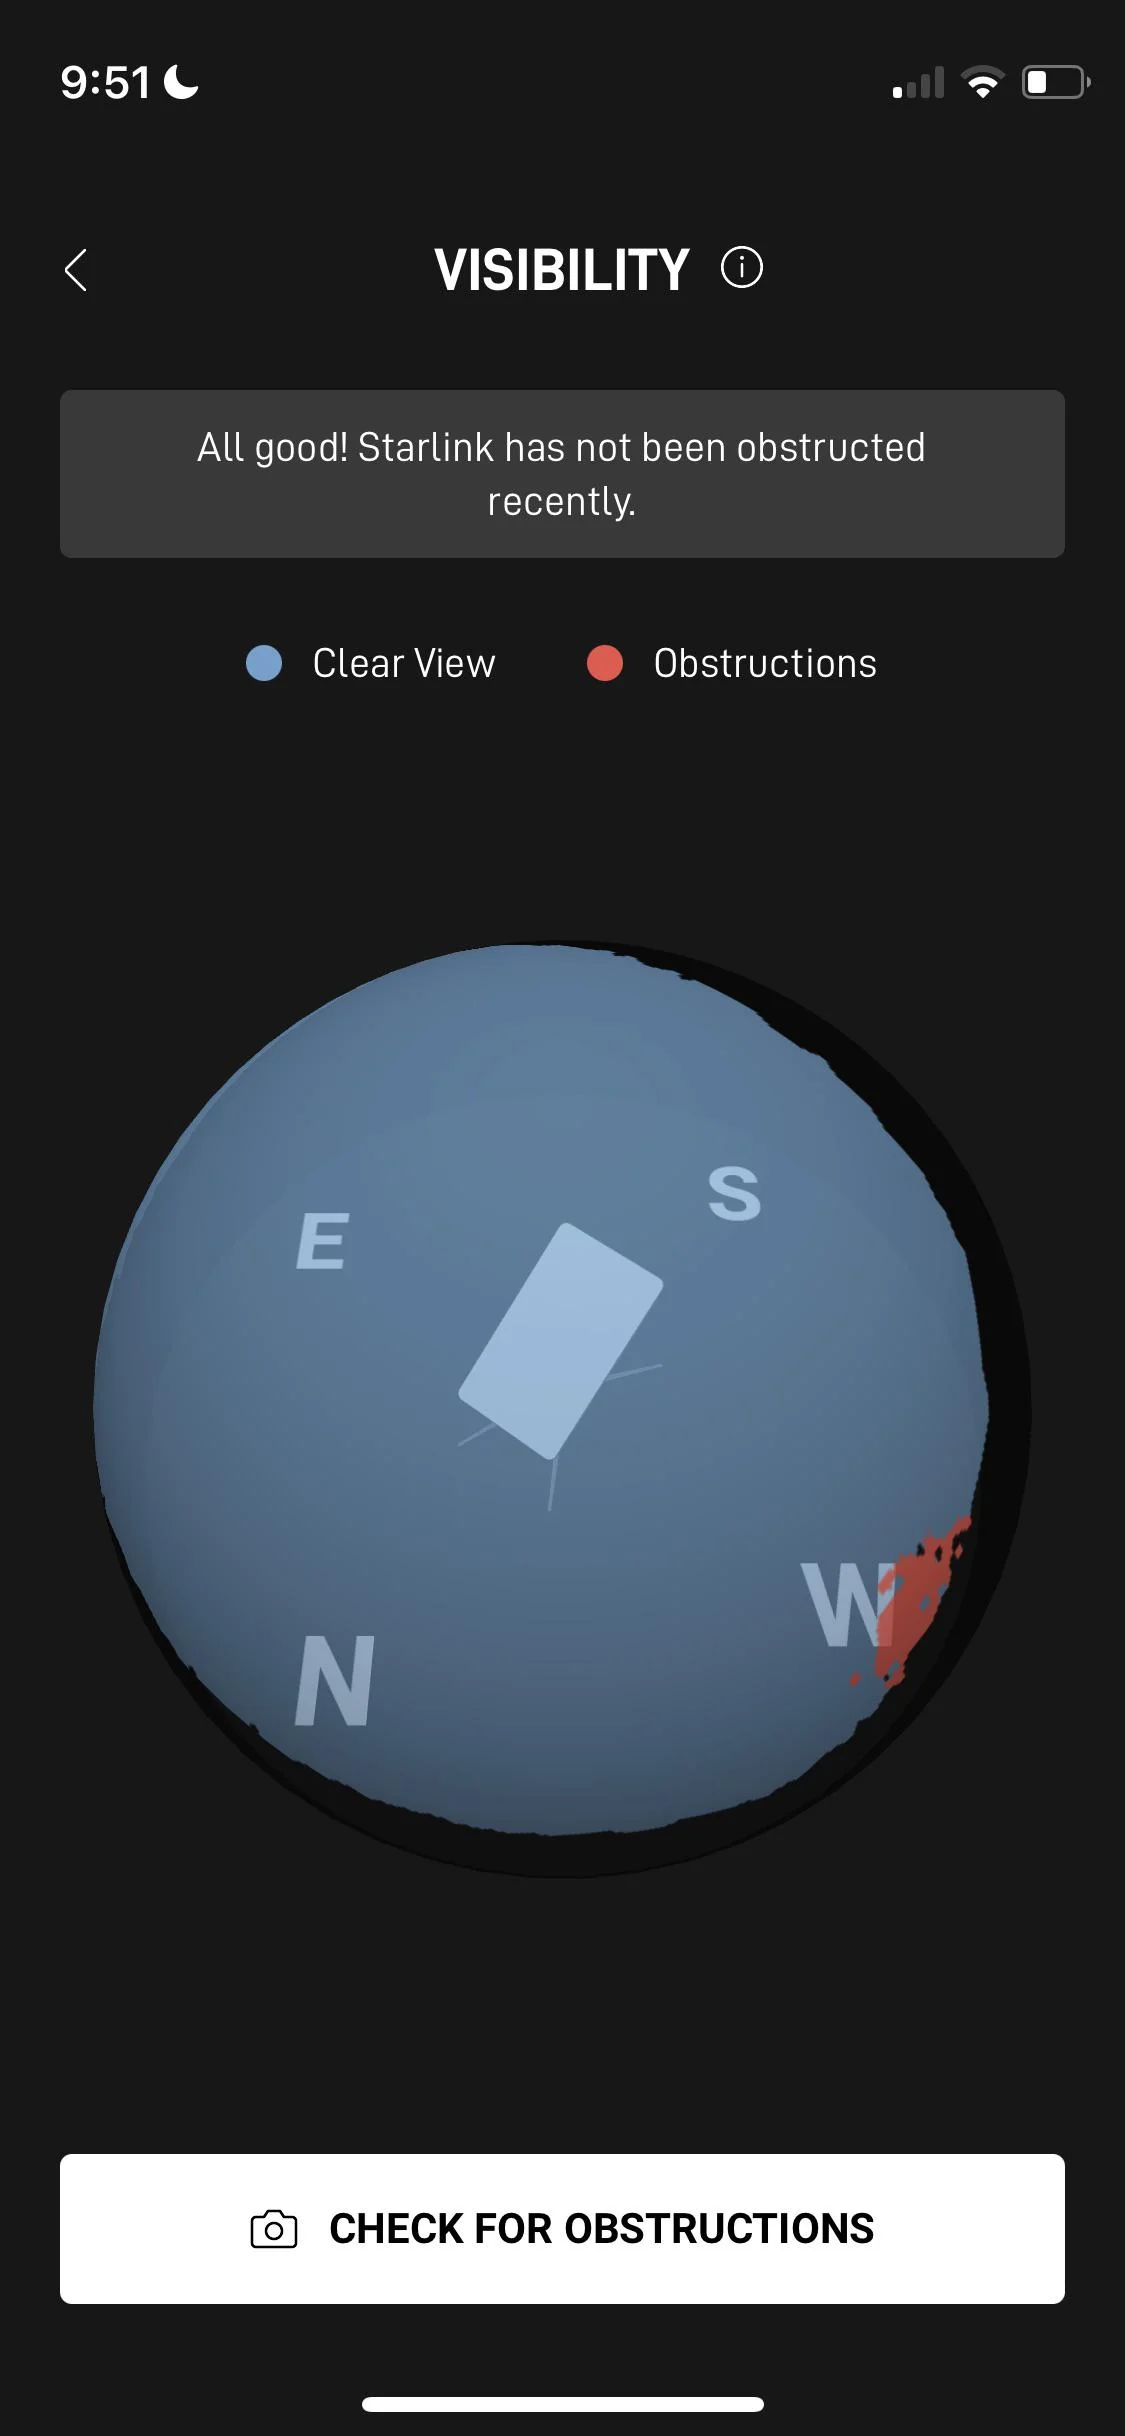
Visibility
One of the most common reasons for non-availability of the internet is visibility. The visibility shows any obstructions that may prevent the dish from performing. The visibility test will take 12 hours of data collection and popular precise obstruction information. You can use this page to monitor any obstruction.
Statistics
The statistics page offers information on latency, outages, and network bandwidth. It is vital for potential troubleshooting issues. For instance, when your internet pauses operation, you can check the Statistics page and see whether it is an outage or find any other problem.
Speed
The Starlink app comprises a built-in speed test you can utilize to test the speed of the internet. As per the company, the customers should expect a download speed between 50-250 Mbps.
How To Get Starlink Support?
When troubleshooting doesn’t solve your problem, it is best advised to get support from the company. You can visit the Support page of the official company website and examine your issue or browse the support subjects. If these areas don’t answer your questions, fret not! You can raise a ticket to Starlink.
On any support topic, scroll to the bottom and tap the ‘thumbs down’ tab where it indicates Did this answer your question? You will be now prompted to a contact page where you can directly reach out to the company. Currently, Starlink doesn’t have a public support email, phone, or chat system.
FAQs
The furthest that the Starlink dish can be placed is 150 feet from the house. This is only applicable if you purchase the 150 ft dimension extension cable from Starlink. You can use the Starlink Ethernet adapter if an additional distance is needed.
The Starlink cable is not ideally meant for burial, but you can surround the Starlink cable in conduit if you must bury the cable.
The Starlink dish requires a 100-degree cone unobstructed view of the sky.
Conclusion
Starlink is a DIY-oriented company ensuring that setting up their dishes is not an upward task for anyone. So what are you waiting for? With the detailed guide above, install your Starlink and have fun while at that.
Setting up Starlink is a straightforward process. That whole process, from unboxing to having speedy internet, was about 20 minutes. Installing your Starlink involves verifying if you have all the correct hardware, assembling the dish, plugging everything in, and completing the setup in the Starlink app.
This blog was… how do you say it? Relevant!! Finally I’ve found something which helped me. Kudos!
Thank You Gabriel.